AvSight Sales
Pricing
This article will cover creating standard customer pricing contract pricing and importing existing pricing into AvSight.
Prerequisites: Creating and Maintaining Vendors and Customers
User Level: Intermediate
AvSight provides the means to set pricing in the system for standard price, customer contract pricing, vendor pricing and repair contract pricing. The pricing information is visible as part of the Part Research screen.

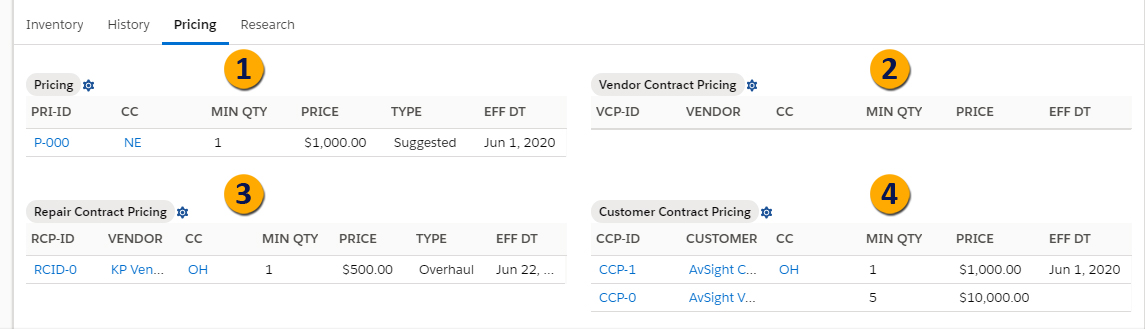
- 1Standard Pricing The price typically charged for this part in the specified condition code.
- 2Vendor Contract Pricing The price negotiated with a specific vendor for this part in the specified condition code.
- 3Repair Contract Pricing The price for this part in the specified condition code when used as a replacement part as part of a negotiated repair contract.
- 4Customer Contract Pricing The price for this part in the specified condition code as part of a supply contract with specific customers. This is set up on a customer-by-customer basis.
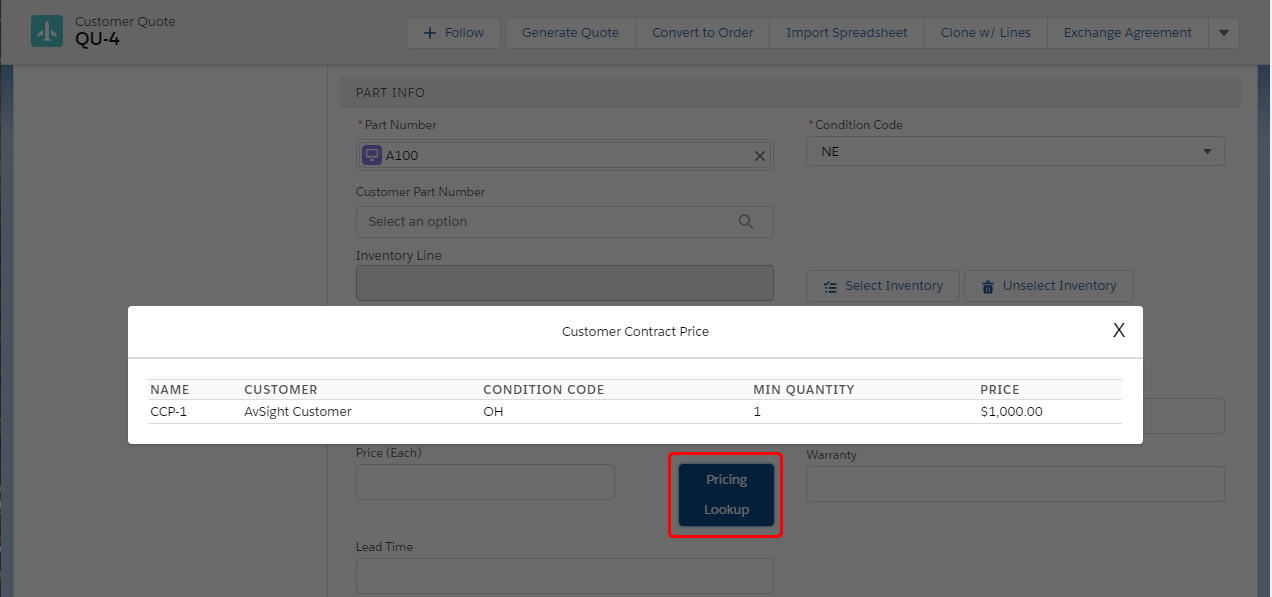
In addition to the Part Research screen Customer Contract Pricing is also available in Customer Quotes. In the Part Info section of a quote, click the Pricing Lookup Button to verify if special pricing has been set up.

Standard Pricing
Standard pricing is set in the Pricing Master section of Financial Admin. From the main AvSight screen, navigate to Administration > Financial Admin > Pricing Master to open the Pricing Master List View. On the list view, select the down arrow next to Recently Viewed and select All to ensure that a price hasn’t already been created. Click New to open the New Price screen.

The New Price screen is divided into 3 main sections:
- Pricing information— This area contains settings that directly affect the price. Part Master—which part does this price apply to? Effective Date—when does it take effect? Price Type—List or suggested pricing? Customer Type—Airline, broker or end user? Only the Part Master field is required.
- Pricing Details— The fields in this area set the price for the part. Min Quantity—Is there a minimum quantity required to receive this price? Price—The price to be charged if the conditions of the price are met.
- Pricing Applicability— This area sets any conditions that must be met to receive the price. Condition Code—The condition code the price applies to. Account Region—Is the price applicable only to certain regions? Product Line—Distribution? Surplus?
Only the Part Master field is required. Once the required information and any additional information is entered, click Save to save the price.
Customer Contract Pricing
Customer Contract Pricing is very similar to standard pricing. From the main menu, select Administration > Financial Admin > Customer Contract Pricing, then select New to open the New Customer Contract Price screen. The New Customer Contract Price screen contains fewer fields, since this price is tailored to a specific customer.
- 1.Select the Customer from the Customer field. This is a type ahead field, so entering the first few characters of the name will display a list of names beginning with those characters.
- 2.Select the Part Master
- 3.Add the Minimum Quantity to qualify for the pricing.
- 4.Enter the Price negotiated.
- 5.Enter the applicable Condition Code.
- 6.Enter the Effective Date.
- 7.Click Save.
Repair Contract Pricing
Repair Contract Pricing follows the same basic procedure outlined above and is located in Administration > Financial Admin > Repair Contract Pricing. Click New to open the New Repair Contract Price screen.
- 1.Enter the Part Number that qualifies for the applicable pricing.
- 2.Select the applicable Repair Type.
- 3.Enter the Price.
- 4.Enter a Minimum Quantity if needed.
- 5.Enter the applicable Condition Code.
- 6.Enter the Effective Date.
- 7.Enter the Vendor Account.
- 8.Click Save.
Vendor Contract Pricing
Vendor Contract Pricing follows the same basic procedure outlined above and is located in Administration > Financial Admin > Vendor Contract Pricing. Click New to open the New Vendor Contract Price screen.
- 1.Enter the Part Number that qualifies for the applicable pricing.
- 2.Enter the Price.
- 3.Enter a Minimum Quantity if needed.
- 4.Enter the applicable Condition Code.
- 5.Enter the Effective Date.
- 6.Enter the Vendor Account.
- 7.Click Save.
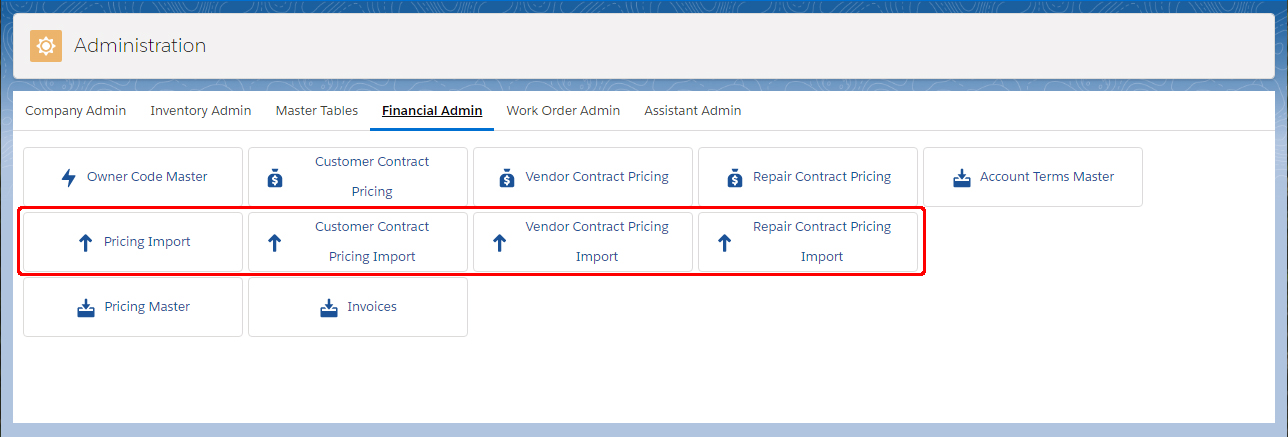
Importing
Pricing can also be imported into AvSight from other sources. All of the pricing types mentioned above can be imported in bulk and all follow the same procedure, although the fields used will vary depending on which type of pricing is being imported.

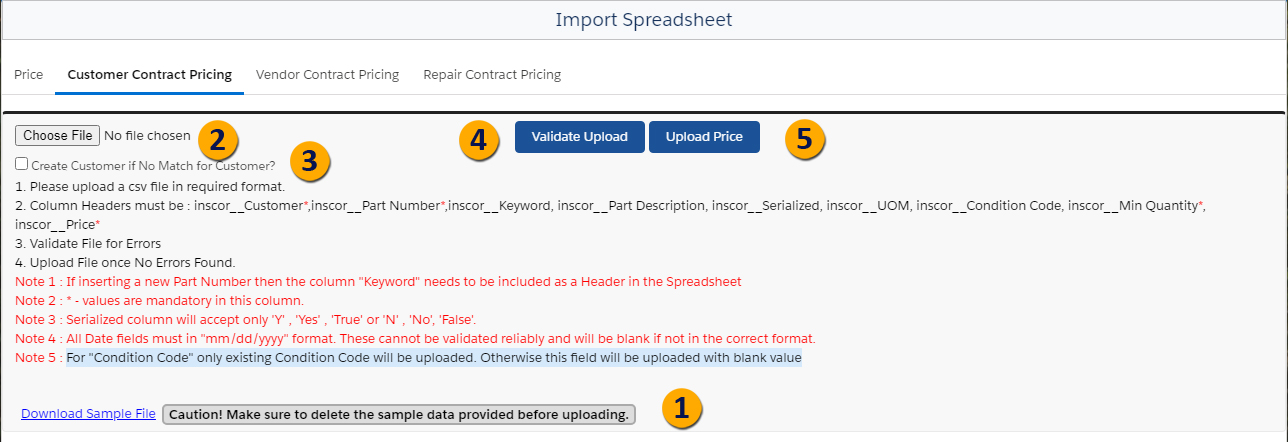
The upload process requires the data to be imported be in the form of a Comma Separated Value file or CSV. This is a common file format that can be created with most spreadsheet applications like Excel. A template is provided to provide all the columns available and make the process easier for you. On the Import Spreadsheet screen, click “Download Sample File” near the bottom of the wording. NOTE: some spreadsheet programs will want to save the file in their native format (.xlsx for example) the file must be saved as a .csv file.
Please note the following:
- Serialized column will accept only ‘Y’ , ‘Yes’ , ‘True’ or ‘N’ , ‘No’, ‘False’.
- All Date fields must in “mm/dd/yyyy” format. These will be blank if not in the correct format.
- It is helpful to perform a trial upload with one or two items to make sure the format is correct, before uploading large amounts of information.
- For Condition Code only existing Condition Code will be uploaded. Otherwise this field will be uploaded with a blank value
- While large numbers of items can be imported at once, it is beneficial to limit the number of items to <1000 to prevent impacting the system for other users.

- 1While you can create your own spreadsheet, AvSight provides a blank sheet with the proper columns needed for each type of record. NOTE: the sample spreadsheet will vary depending on the type of record being used as Customer, Vendor and Repair will have different fields. Download the Sample Spreadsheet and add the information required. The fields listed on the dialog box with an * are required fields. Save the spreadsheet with a meaningful name. NOTE: some spreadsheet programs will want to save the file in their native format (.xlsx for example) the file must be saved as a .csv file.
- 2Click Choose File and select the file to be imported.
- 3If you would like to have AvSight automatically create the Customer (or Vendor)—a required field— for any that are missing, select the check box next to Create Customer (or Vendor) if No Match? box.
- 4Click Validate Upload. This step will inspect the information in the spreadsheet and detect any errors such as missing required fields or improperly formatted fields. The system will respond with an OK, or provide a list of errors found. If there are errors, they will need to be corrected and step 2 will need to be repeated until the validation succeeds.
- 5After a successful validation, click Upload to import the data into the record.
Once the import has successfully been imported, the screen will provide a link to see the status and results of the import.