AvSight Sales
Creating Sales Orders
This article will cover the basics of creating Sales Orders
Prerequisites: None
Required: | |
|---|---|
Customer | Condition Code |
Part Number | Quantity |
Unit Price | Account Terms |
Inventory | |
In this article we will cover the process of creating and processing a Sales Order. The sales order process is integrated with many of the other parts of AvSight and will require information from other areas already covered in earlier articles. As with all of the AvSight screens, this required information can be created while working within a related area. However, it is highly recommended that you complete all of the previous articles under Administration, Inventory Management and Contact Management first. There are two places within AvSight where a sales order can be created. The process is identical in both, however, depending on the access location, some of the information may be prefilled.
Creating a Sales Order from scratch
- Login to the AvSight system and Navigate to Sales Orders on the AvSight Menu. On narrower resolution screens you may need to select the More tab and choose Sales Orders from the drop down list.
- Select New in the Site Level Menu.
- By default, the Sales Orders screen defaults to Recently Viewed, to change this, select the drop down next to Recently Viewed and choose All. This will ensure an order hasn’t already been created.
- Select New from the menu on the right side of the Sales Orders screen and the New Sales Order form will open.
- Required fields:
- Vendor
- While not required, the following fields will be helpful in completing the sales order:
- Contact
- Enter the required information and any additional desired information and click Save.

Once the sales order is saved, you are automatically taken to the next step of the process—Lines. This area will allow you to add line items to your sales order. Please note: Most of the screens in the process will allow you to enter comments as part of the process. Internal Comments will only appear in the AvSight system. External Comments will be printed on any correspondence with the vendor.
Adding a Line Item
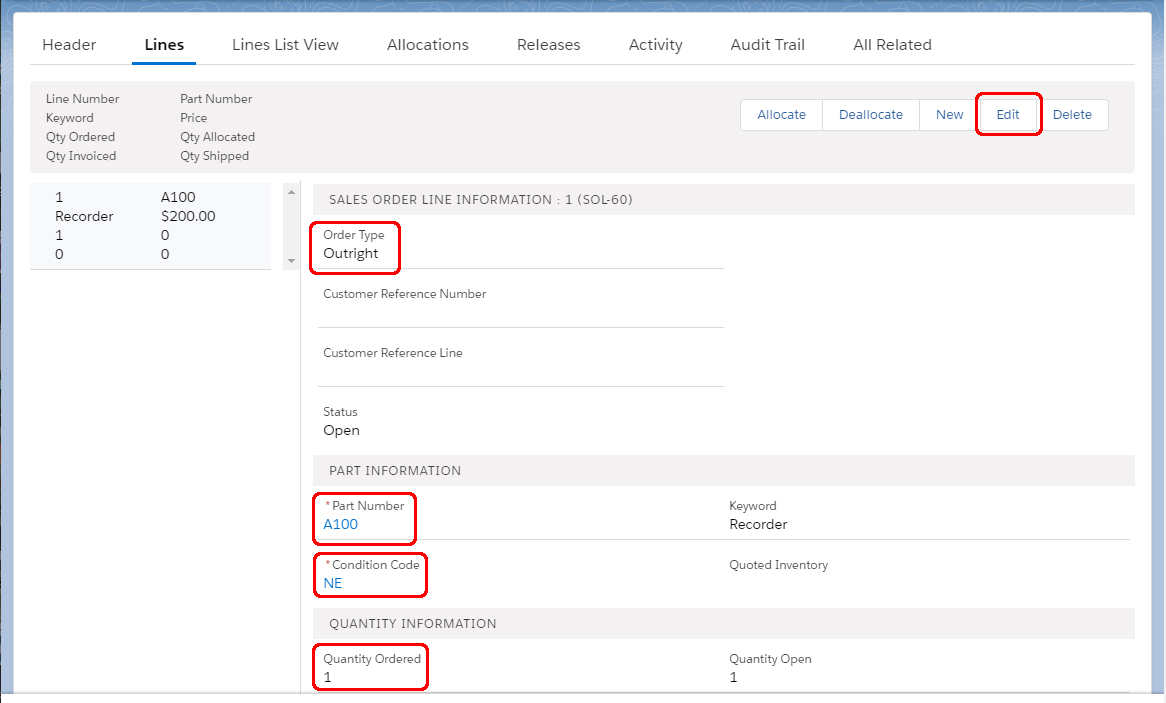
On the Lines screen, click new from the Quick Links menu to open the New Sales Order Line page. The following fields are required or helpful in the process:

New Sales Order Line Section
Order Type Choose between Outright or Exchange . Exchange orders involve parts that may have a core charge and provide additional fields with which to track the status of the part being exchanged.
Part Number The number of the part being quoted.
Condition Code Select the desired condition code from the drop down list.
Quantity Enter the quantity to be sold.
Price The price being quoted to the customer.
Account Terms The payment terms extended to the customer—i.e. Net 30, COD, etc.
After completing the necessary information, click Save.
Allocating Inventory
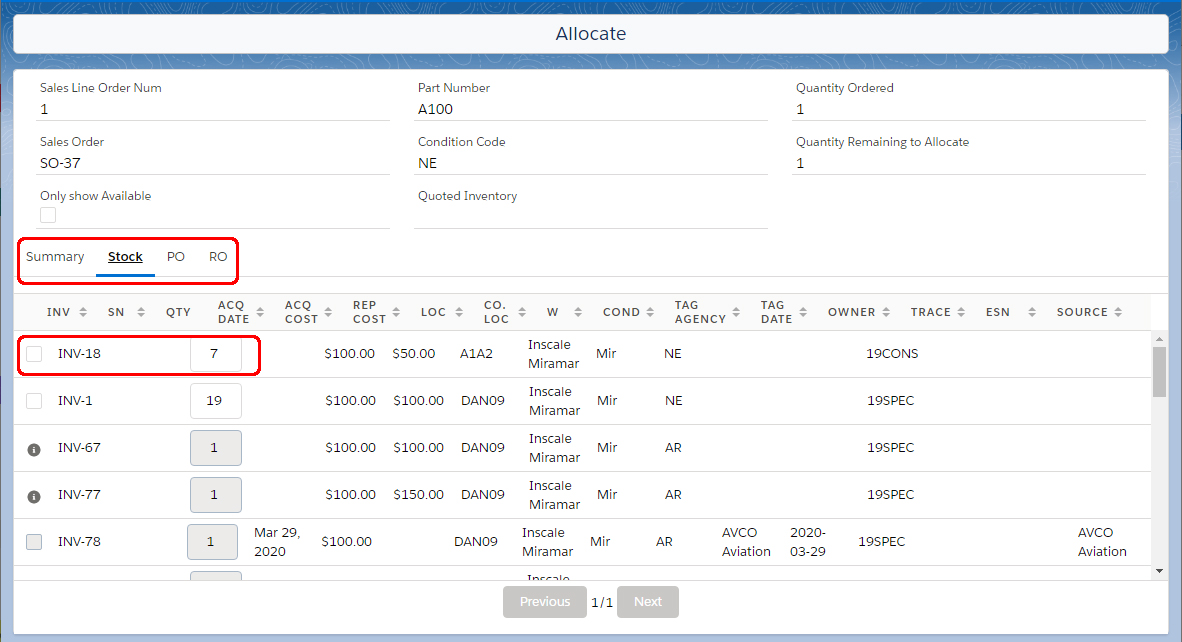
Each line item on the sales order must be allocated from inventory. Once a sales order has been created, the next step is to allocate inventory from either Stock, Purchase Orders, or Repair Orders. Allocating inventory reserves the inventory and prevents it from being shipped or allocated to another Sales Order.

To allocate inventory, click the Allocate button from the right side of the details screen to open the Allocate screen.
In addition to the header information of the order line item the Allocate screen displays a summary of the availability of the part specified. Select one of the tabs below to allocate inventory from that area by typing the desired quantity to allocate in the quantity field.
Stock The stock tab shows all inventory lines that are in stock for the selected part number. For this tab, you can allocate any inventory from stock that matches the condition code of the line you have selected. If the condition code does not match the sales order line selected, the quantity box is grayed out.
Purchase Order The Purchase Order tab shows all lines that are available on open Purchase Orders. If the condition code does not match the sales order line selected, the quantity box is grayed out.
Repair Order The Repair Order tab shows all lines that are available on open Repair Orders. If the condition code does not match the sales order line selected, the quantity box is grayed out
Additional Tabs
Since the Sales Order process is integrated with other areas of AvSight, the remaining tabs will allow you to assign a task or log a call (Activity), See any changes that have been made to the quote (Audit Trail), upload files or see any other information associated with the sales order (All Related).Generating a Release
At this point a Release can be generated. Before an order can be pulled and shipped, the warehouse must be authorized to pull the items from inventory and ship them. A release provides that authorization. From the Quick Links menu, Click Generate Release. This will open a dialogue box to provide the information needed by the warehouse for processing. The Generate Release form contains two tabs—Address and Options. The Account Shipping field is a drop down that allows you to select from shipping addresses stored in the customer profile. NOTE: If left blank, this will prefill with the default shipping address stored in the account. If no addresses have been created with the account, this will need to be filled in. This will also override and shipping information stored in the account if a different shipping address is needed for this sales order.The Options tab contains the following fields:
Requested Ship Date
Paperwork Only/Hold Indicates whether only paper work should be generated at this time. Hold will allow the release to be generated, but indicate that no further processing should be done at this time. Select a reason from the hold from the list.
AOG Indicates the shipment should be rushed as an aircraft is grounded waiting for this part.
Internal Comments These comments will not appear on any customer related correspondence.
External Comments Theses comments will appear on related customer correspondence.
Ship Method Select the required shipping method.
Account # The shipping company account the shipping charges will be billed to.
Bill Freight Via By whom and how the charges will be paid.
Billing Contact The contact that should receive the invoice.
Account Terms (Required) This is a search field that search for items in the Account Terms Master Table.
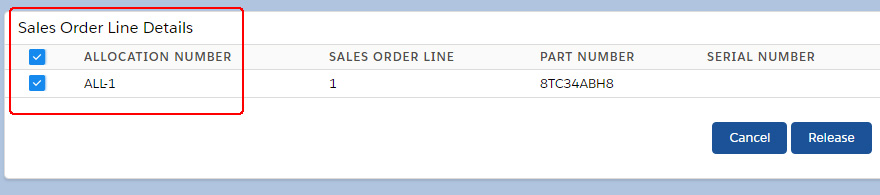
Sales Order Line Details

The Sales Order Lines section allows you to specify which items from the sales order are to be released. By default, all of the lines from the sales order that have been allocated are checked. Uncheck any line items that are not being released at this time. When finished, click the Release button. The sales order is now ready to be processed in the operations section of AvSight.
Creating a Sales Order from a Customer Quote
The second method to create a sales order is to convert a Customer Quote. To convert a quote, open the quote and select Convert to Order from the page menu to open the Convert to Sales Order form. This will display all of the line items from the quote and by default all are checked. Uncheck any items that should not be added to the sales order and adjust the quantity as needed. When finished, click Convert to create the sales order and open the sales order details screen. The rest of the process is identical to that outlined above.Creating a Sales Order from a Customer Quote
The second method to create a sales order is to convert a Customer Quote. To convert a quote, open the quote and select Convert to Order from the page menu to open the Convert to Sales Order form. This will display all of the line items from the quote and by default all are checked. Uncheck any items that should not be added to the sales order and adjust the quantity as needed. When finished, click Convert to create the sales order and open the sales order details screen. The rest of the process is identical to that outlined above.
Acknowledging a Sales Order
The Sales Order Acknowledgment is found under the Generate Documents menu in the Quick Links menu of the Sales Order. Select Acknowledgement from the list of available documents and click Next. On the following page, select the line items to be acknowledged and click Next. On the Generate Documents dialog box, there are several options:
Select a Comment If Quick Comments have been set up for this form, they can be selected from the drop down here.
Comments Manually add comments here. These comments will appear above the shipping and billing address area at the top of the acknowledgement.
Header External Comments These comments appear in the Special Instructions area of the acknowledgement.
Click Next to generate the Acknowledgement as a PDF attachment to an email. The email form allows the Contact, Subject, CC and Body to be edited as needed. The acknowledgment itself can be downloaded or printed. Click Send Email to send the acknowledgement.

Sending a Shipping Confirmation
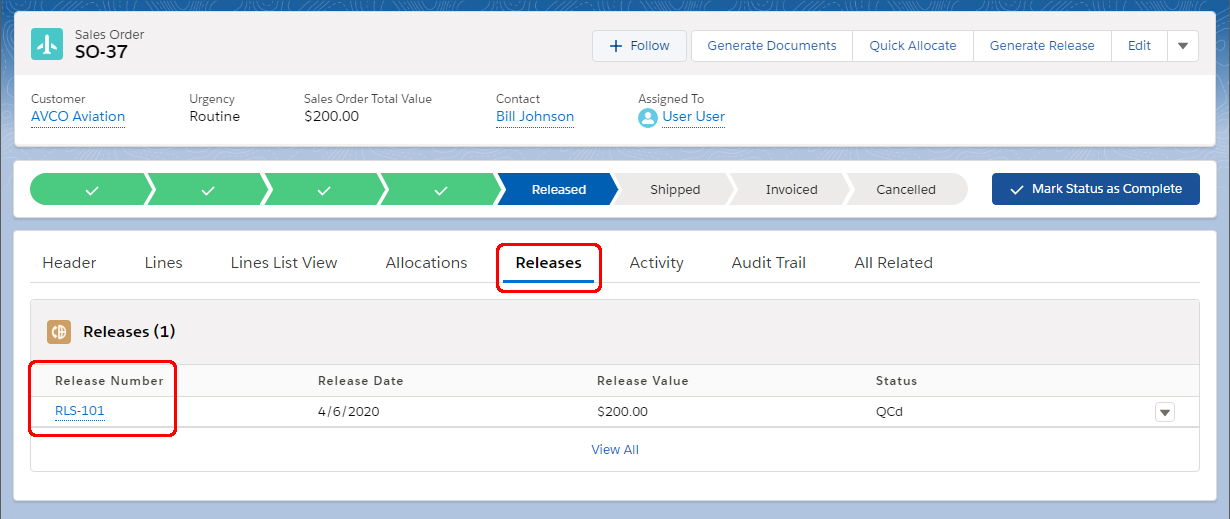
Once a Release has been generated, a Shipping Confirmation can be sent to the customer. Open the Sales Order to be used and navigate to the Releases tab.
Select the Release Number to be confirmed and select Generate Documents from the Quick Links menu. Select Shipping Confirmation from the available documents and click Next. This will open a text only (no PDF) email form that can be edited as needed. When finished, click Send Email.