AvSight Administration
Creating and Managing Companies
This article will cover the basics of creating a company and managing its settings
Prerequisites: None
User Level: Beginner
Information needed to complete the steps: |
|---|
Company Name |
Address |
The first step toward getting your AvSight instance up and running is creating your company and entering all of the required information. While there are a number of fields that appear on the company screen, in this section we will focus on the basics in order to get your system operational as quickly as possible. There are two options to create a company and add the required information—manually and importing from another source. Importing will require the assistance of AvSight support and is beyond the scope of this article.
Creating a Company

- Login to the AvSight system and Navigate to Administration on the right side of the AvSight Menu. On narrower resolution screens you may need to select the More tab and choose Administration from the drop down list.
- Select Company Admin in the Page Level Menu.
- Select the Company Master button to open the Companies screen.
- By default, the Companies screen defaults to Recently Viewed, to change this select the drop down next to Recently Viewed and choose All. This will ensure a company hasn’t already been set up.
- Select New from the menu on the right side of the Companies screen and the New Company form will open.
- Required fields:
- Company Name
- Address
- Required fields:
- Enter the required information and any additional desired information and click Save.
Since AvSight is capable of interacting with other programs such as QuickBooks and ILS, other fields may be used to integrate those options. These topics will be covered in more advanced articles.
Additional Fields
Operations Settings

Enable Early Delivery Warning Sets an alert if items coming in earlier or later than expected. Commonly used for purchases where scheduled deliveries were requested to ensure parts don’t all come in early instead of just in time. To enable the early warning, select the check box and then set a warning threshold in days.
Export Control Logic Determines whether to enable export holds under specific conditions. (See article Export/Credit Holds).
Invoice Auto Send Time Specifies the time of day to automatically send customer invoices if enabled. (See article Automated Invoice Mailing).
Miscellaneous Settings

Show PN Comments on PR? Enables an internal comments text box to be displayed on the Parts Research screen.
Include Secondary in PR Summary? Determines whether or not to include Secondary Inventory in the parts Research Summary.
Show Receiving Barcode Feature? Determines whether to display the barcode printing feature in Receiving. NOTE: The actual setup of a barcode printer requires the assistance of AvSight Support. Please contact for assistance with this task.
Account Unapproval Schedule Determines how often to perform a check to verify criteria that may affect a customer/vendor account's approval status. This check can be performed nightly or weekly.
Allow SN in Receiving when not serialized Displays the Serial Number field even if a part is not serialized. This allows other tracking information to be used, such as the manufacturer's lot number.
Default Part Numbers

Bill Core Repair Used in the Exchange screen when billing the repair charges on the customer’s core for an Exchange Cost Plus scenario.
Bill Core Outright Used in the Exchange screen when billing the Core Outright.
Shipping Freight Provides the means to add freight charges directly in the shipping screen to be added to the customer’s invoice.
Letterhead

Letterhead fields draw information from the Company Information screen. Selecting the various checkboxes in this section will determine which Company Information fields will display in the letterhead used for various communications in AvSight.
Company Locations
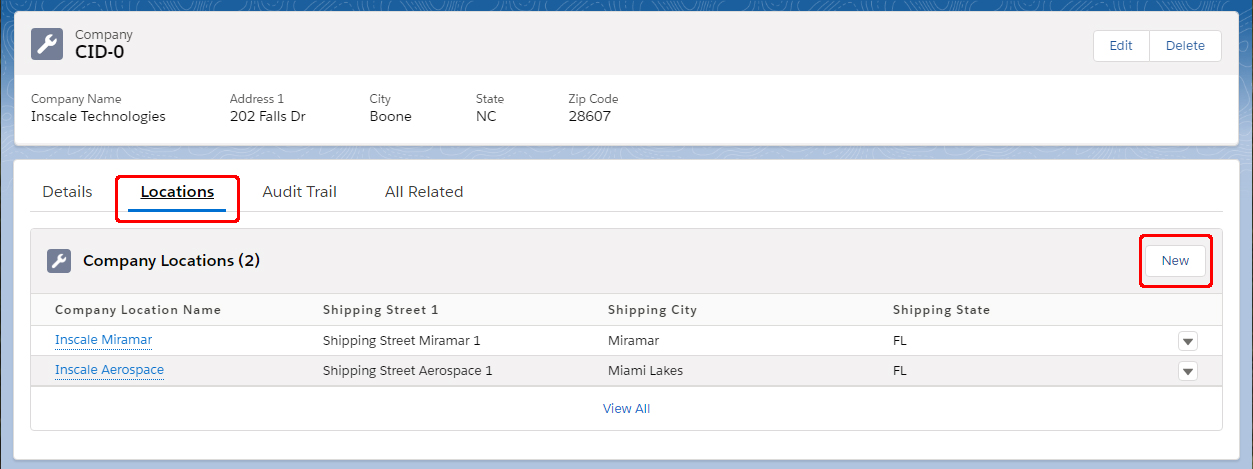
While multiple companies can be used in AvSight, most users will work with a single company, but with multiple locations. Locations can be another branch, division, office or even a virtual location depending on the needs of the company. However the organization is structured at least one location is required. Locations can be created in either of two places in AvSight--Either in the Company Locations Master located in Administration > Company Admin > Company Locations Master or under the Locations tab of the Company screen.


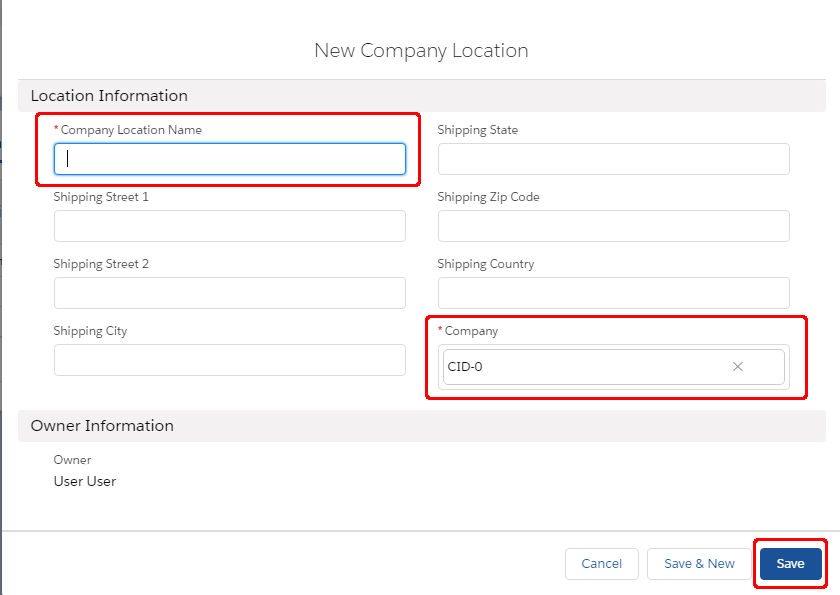
Regardless of which method used to add a location, click New to open the New Company Location screen. The only required fields are the Company Location Name and the Company ID. NOTE: if accessing the New Company Location screen from the Locations tab of the Company Master, the Company ID will be pre-filled with the ID of the company used in the Company Master. While not required, entering the shipping information can save some work later in the workflow, where such information is needed for POs and other documents requiring a shipping/receiving address. When finished click Save to add the location.


