AvSight Operations
Receiving
This article will cover the basic of the Receiving process.
Prerequisites:
Creating Purchase Orders OR Creating Repair Orders
User Level: Beginner
After a Purchase Order or Repair Order has been sent to the vendor, the next step is to receive the goods and place them in inventory. The receiving process is integrated with many of the other parts of AvSight and will require information from other areas already covered in earlier articles. It is highly recommended that you complete all of the previous articles under Administration, Inventory Management and Contact Management first.
Beginning the Receiving Process

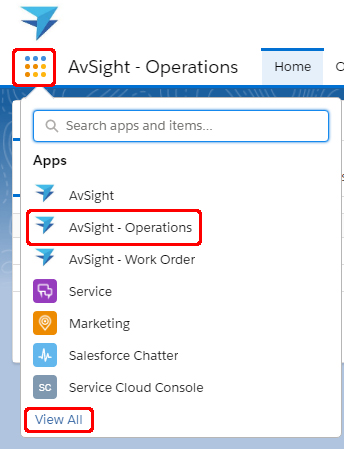
Receiving is located in the Operations Module of AvSight. To access the Operations Module click the Apps Launcher Menu in the upper right corner of the screen and select AvSight Operations from the App Launcher. If Operations is not visible, click View All to see more items.
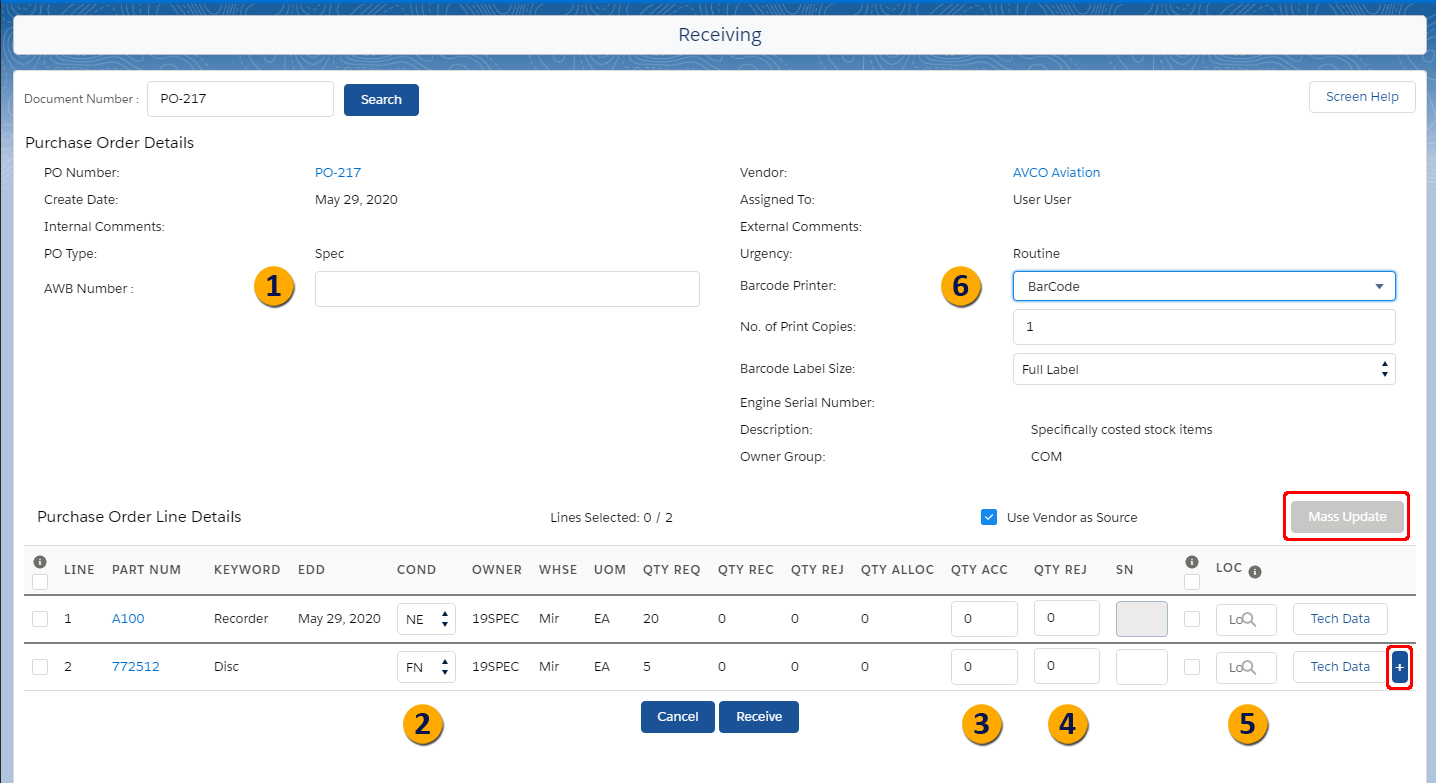
Notice that there are now a new set of choices available in the navigation menu. Select Receiving to open the Document Number search box. This search box searches for a specific document rather than performing a general search; therefore the exact document must be entered—PO-9 rather than PO or PO-. Click Search to open the details screen for the PO or RO.
After entering a document number, any lines with a remaining quantity to be received will be shown in the list below. The following fields can be entered:

- 1AWB Number – this is the AWB number on the receipt. This is not a required field, but can be used to track receiving information.
- 2Condition code – This is defaulted from the entered document, but it can be changed during receiving, if the part received is in a different condition than ordered.
- 3QTY Accepted – This is the quantity that will be received into stock. It does not need to be the full amount on the document line, but it cannot be greater. If you have received a larger quantity, the document must be updated.
- 4QTY to Reject – Entering an amount here, will still receive the parts into stock, but will make them unavailable for shipping. This will create an inventory line just for the rejected quantity to be worked by the appropriate personnel.
- 5Loc – Location of where you are putting the part after receipt. This can be an intermediary location (cart, etc.), or the final location in the warehouse. This list only shows locations for the Company Location the warehouse code is tied to.
- 6Bar Code Printer - Allows a bar code label to be printed to help track the parts. This feature must be enabled in AvSight Settings and in Company Master (See Related Articles)
Rejecting Items Received
At times items may be received that do not meet the criteria expected. For instance the items may be damaged, in a different condition than expected or a different part number than expected. If any items are to be rejected, enter the number to be rejected (if serialized, see the paragraph Working with serialized items below). Notice there is now a magnifying glass icon to the right of the quantity field. Clicking the icon will open the Rejection Reason dialog box. The following items are available for selection:
Entering Technical Data
For each part, you can also enter optional Technical Data for each line. Technical data is information that may be related to the condition or history of a part. This data can be viewed and printed during many phases of the sales process to provide data to customers as needed. To enter this data, click the “Tech Data” button next to the line you are receiving.
Quality-Cond The condition of the item does not meet the criteria specified on the receiving document.
Quality-PN The part number does not match the part number specified on the receiving document.
Quality-Ppwk The paperwork accompanying the item is insufficient or incorrect.
Order-Qty The quantity received doesn’t match the qty specified on the receiving document.
Order-Packaging The packaging does not meet the criteria on the receiving document.
Comments A comment should be entered to document the reason for rejection.
Working with Serialized Items
If the part being received is serialized, each part will require a new line item in order to enter the unique serial number. If the part is serialized, a blue “+” will appear to the right of the Tech Data button. Clicking the plus sign will add another line item. The QTY ACC field or QTY TO REJ field should be set to one, since each part will be unique because of the serial number. If all items will have the same tech data and the same location, using the Mass Update button will allow that information to be added to all the items at once. Once multiple line items have been created, a check box appears to the left of the line. Selecting multiple lines will activate the mass update button.
Receiving Pre-allocated Items
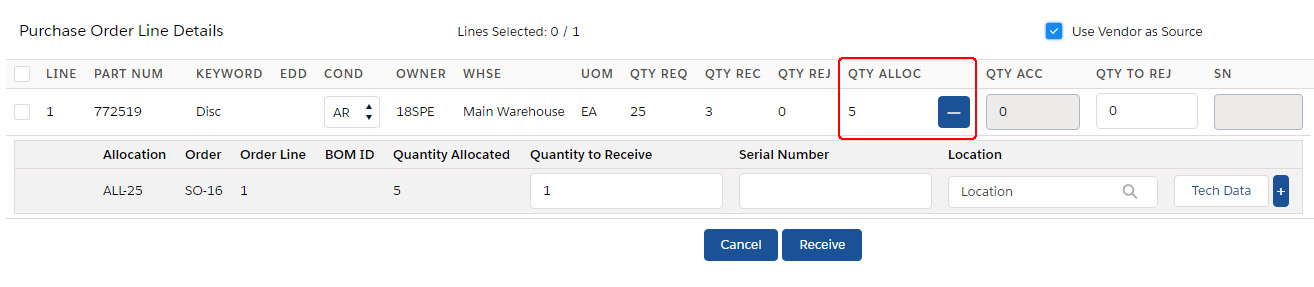
At times sales orders may be generated for items that may not be currently in stock but may be pending the receipt of a PO or Repair Order. (See related articles below). In that event, the Purchase Order Line Details or the Repair Order Line Details screen of the RO or PO being received will show a “+” next to the QTY ALLOC field and the number already allocated will display. Clicking the “+” will open the allocation details for each allocation that has been created. The parts to be checked in and applied to each of those allocations can be checked in by following the steps outlined above.

When finished, click Receive to enter the items into inventory. This will take you to the Attach Documents screen and allow documents to be attached to the item record.
Docking Option
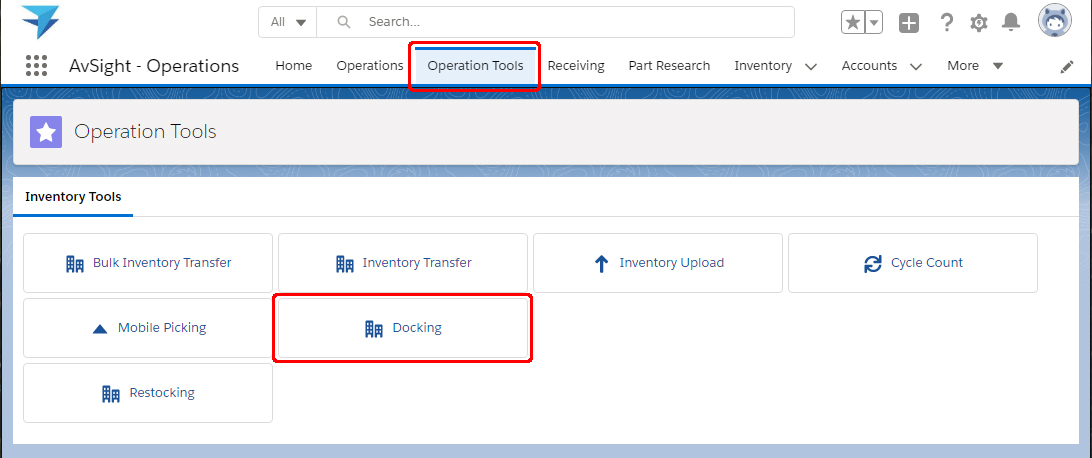
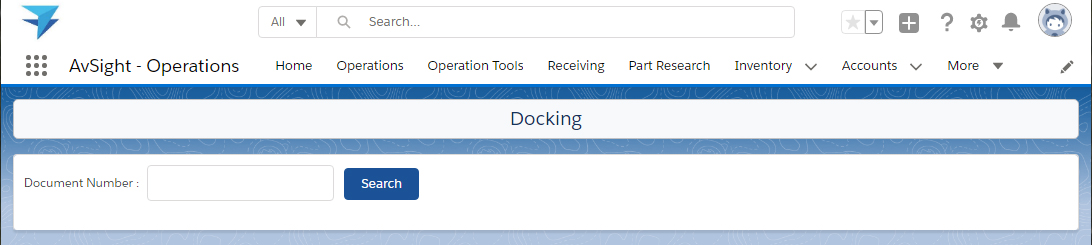
AvSight offers the ability to quickly acknowledge receipt of shipments during busy warehouse times. Docking allows a shipment to be entered into the systems without all of the details and provides a mechanism to return to the shipment to complete the process at a later time. To begin, open Operations Tools from the main menu and select the Docking button.


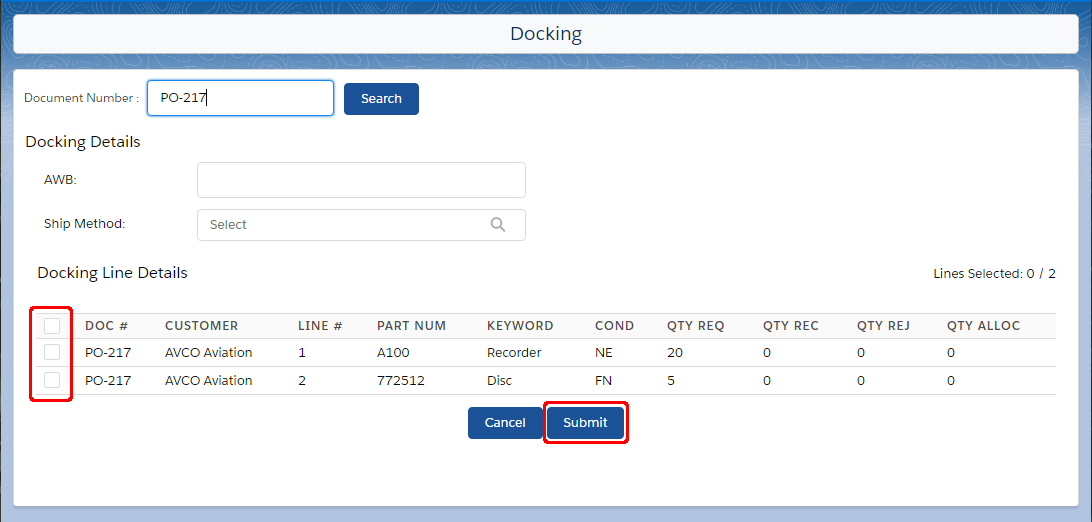
Enter the document number in the search field as normally done in Receiving and click Search, This will open a screen similar to the Receiving screen, but does not allow any information to be entered. Select the lines to dock and click Submit.

To complete the process of receiving at a later time, open the Receiving tab from the main menu. Notice there is now a reminder that items have been docked but not received. Enter the document number in the search field (in this case PO-217) and click Search. Complete the receiving process as you normally would.

Inventory Rejection Management
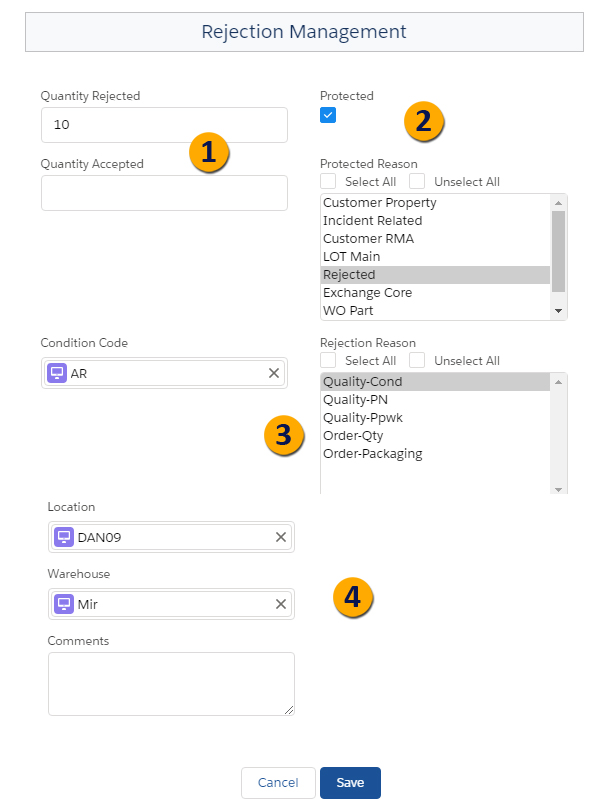
If items have been rejected at the time of receipt, they can be accepted if desired. Open the inventory containing the rejected items and from the Quick Actions menu select the down arrow, then select Rejection Management to open the Rejection Management Screen,


- 1Enter the number of items to accept in the Quantity Accepted field and change the Quantity Rejected accordingly. Clearing the Quantity Rejected field will automatically accept all items.
- 2By default, all rejected items are protected. Uncheck the Protected? box and select Unselect All in the Protected Reason section.
- 3Select Unselect All in the Rejected Reason section.
- 4Make any necessary changes to the Condition Code or Location and click Save.